BMW M3 and M4 - The Icons
BMW Garage BMW Meets Register Today's Posts
home
Technical Sections Suspension / Brakes / Chassis

Post Reply
 
Thread Tools Search this Thread
      02-17-2022, 08:46 AM   #1
tdott
Brigadier General
3943
Rep
3,988
Posts

Drives: M3
Join Date: Nov 2010
Location: South FL / 6ix

iTrader: (4)

DIY - G80 / G82 M3 / M4 Complete Guide to Lowering Springs Installation (RWD)

Couldn't find all of this info in one place so I thought it would be a good idea to get everything together and easier to find for future owners.

The Evolve & XPH MSS HAS install videos are very good guide and should be your starting point, they did however miss a few things like torque specs and tools required which I will cover below:

Evolve MSS HAS Install Video:


Extreme Power House install video:


Tools required:
  • 18mm 12pt strut socket - I suggest a socket like this to torque the top strut nut to spec
    - https://amzn.to/3phVWhh
  • 10mm crow foot / offset box wrench - This makes it easier to hold the strut shaft while torqueing the nut.
    - https://amzn.to/3HYhC9n
  • 10mm wrench or socket + 9mm wrench
  • 16mm wrench and t30 torq
  • 18mm socket + wrench
  • 21mm socket + wrench
  • lift / quickjack or jack / jackstands

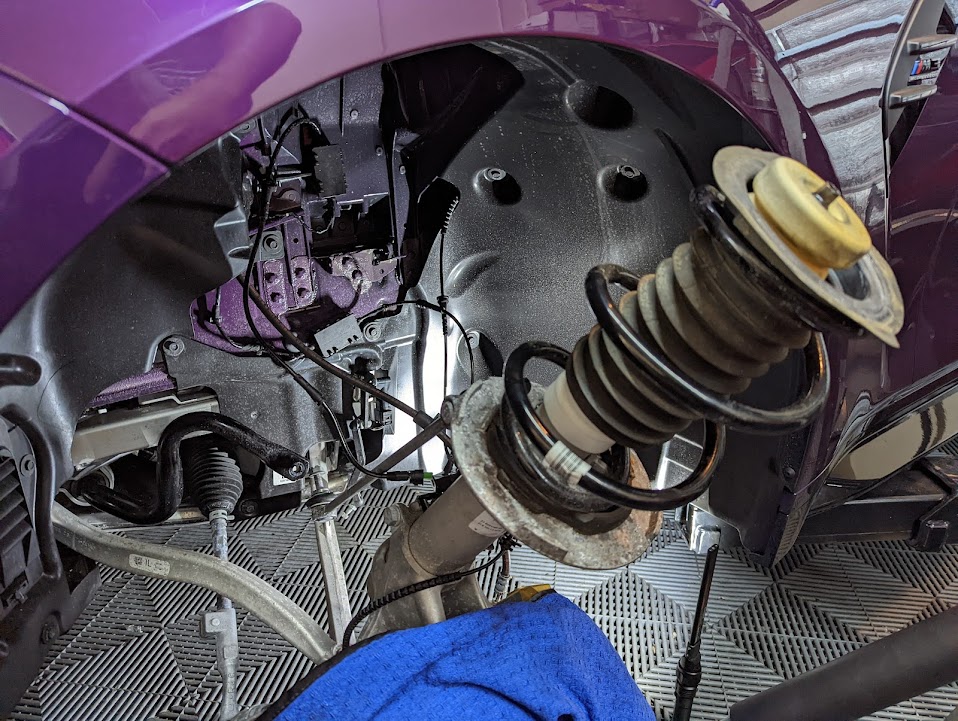
*BMW sometimes changes hardware throughout the model years which may require different tools, always double check before starting the project if you are in doubt or have limited access to tools

Instructions:
Start by lifting the car, if working on jack stands you'll want to get the car up as high as possible. Take the wheels off, then choose what end you want to start on, or you can do each corner at a time if working on the ground but that will probably be a bit harder / tedious. An alignment is highly recommended / required shortly after install, after a few days of driving or before any long distance drives.

Disclaimer:
If you are at all uncomfortable or inexperienced working on projects yourself (especially projects involving dangerous tools), please reconsider doing the job yourself. It is very possible on any DIY to damage your property, create a hazardous condition, or harm or even kill yourself or others. Myself nor this forum would be responsible for any damage as a result, proceed at your own risk


Front:
  1. Place a jack or stand under the front control arm to support the knuckle, jack it up or lower the car onto it to compress that corner
  2. Remove either end of the front sway bar link with a 16mm wrench + t30 torq.
  3. Disconnect the height adjuster arm (LF/Driver side only) with a 10mm socket or wrench
  4. Remove all wires (abs sensor, brake pad sensor, EDC strut wire) and brake line from there mounting attachments. Make note of how they are routed.
  5. Under the hood, remove the plastic covers covering the strut and disconnect the EDC connector.
  6. Remove the 18mm nut holding the strut to the upper mount. (Can use an impact to remove, or use the strut socket and offset box wrench if you don't have one. )
  7. Slowly and carefully lower the front knuckle or raise the body (if working on a lift) while holding or supporting the strut assembly (useful to have a helper here). You want to lower it as much as possible or until it stops.
  8. Slowly and carefully swing the strut assembly out of the fender, I like to hold the top of the strut to make sure it doesn't contact the fender

  9. Now you can replace the spring by removing the rubber boot, and bump stop, place the new spring onto the strut, lining up the end position with the mark the previous spring made, put the rubber boot and bump stop back in.
  10. Check and confirm the orientation of the spring, for AST springs you'll see it the top and bottom are different sizes, the correct orientation is with the AST markings upside down like this:
    ***Bonus note and warning*** If you see these plastic bump stops remove them, they are shipping bump stops that should have been removed during the PDI and cause the car to sit higher and ride poorly.

  11. Once you have the lowering spring and everything back in, carefully swing the strut assembly back under the car. Support the knuckle by the control arm, slowly compress the strut while lining up the top and ensure the strut shaft is centered and goes through the strut mount and comes out on top.
  12. Put the 18mm nut back on, you can choose to torque it now or just snug it up and torque it to spec when the wheels are back on the ground.
  13. Torque spec of the top strut nut is 71nm / 52 ft lbs. Use the 18mm strut socket and 10mm offset box wrench for this with a torque wrench.

  14. Re-attach the sway bar end link and all wires, edc connector, height adjuster and brake line that were moved.
  15. Reconnect the EDC connector under the hood and put all plastics back in place.
  16. Put the wheel back on.
  17. Front is done, grab a beer.


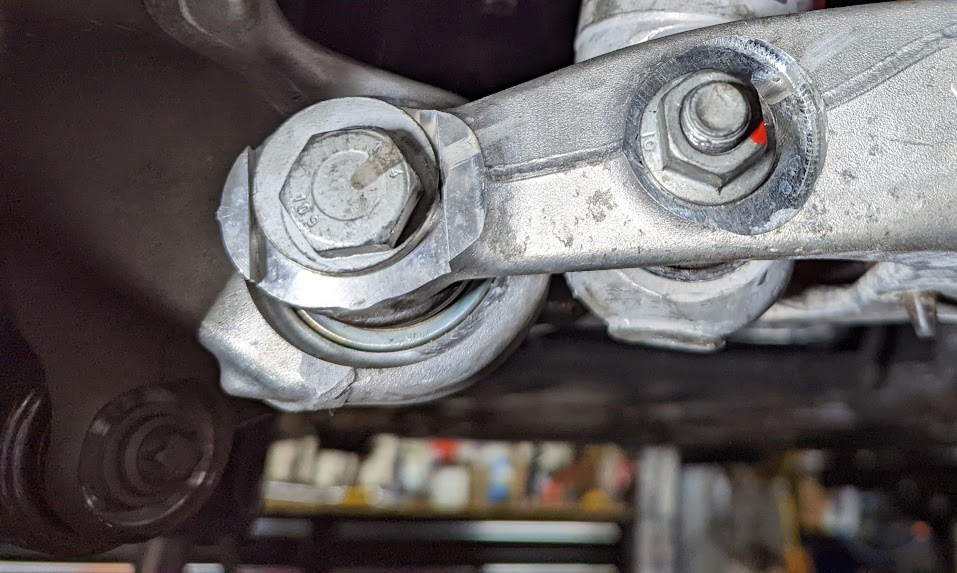
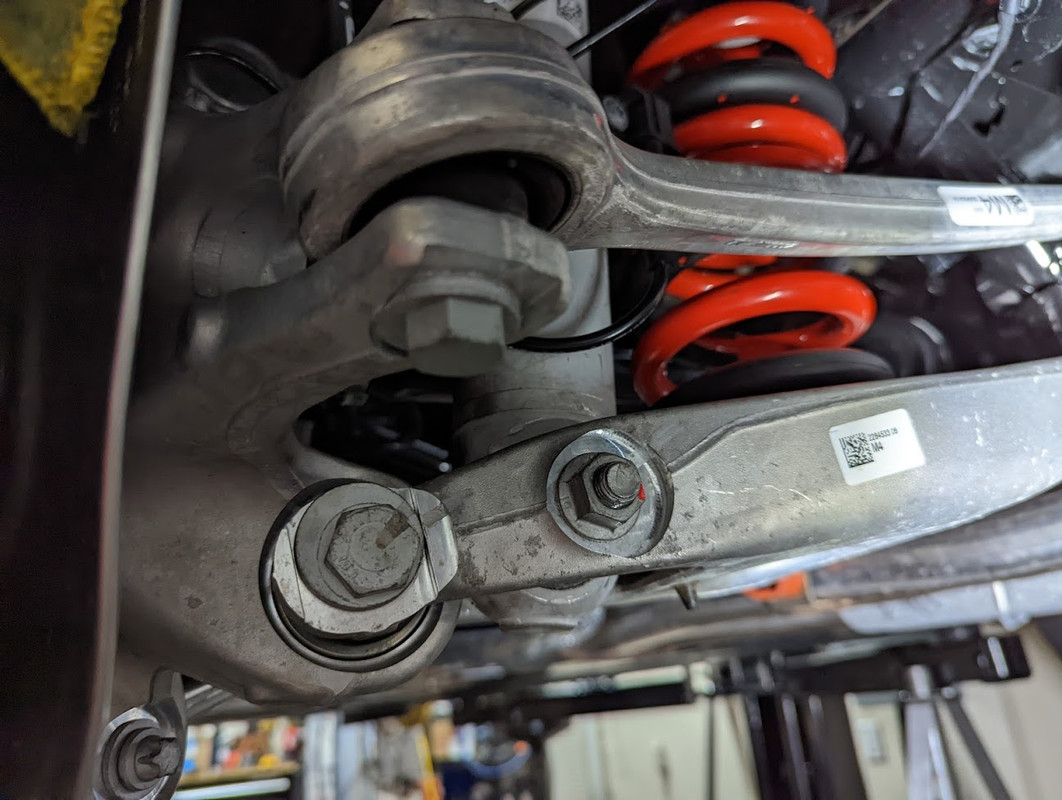
Rear:
*I choose to remove the shock bolt/nut and the camber strut/bolt, Evolve removed the inner control arm bolt/nut and left the camber bolt/nut on. I think that approach is a little harder to get the arm lined up when reinstalling, but you can choose whichever method you prefer.
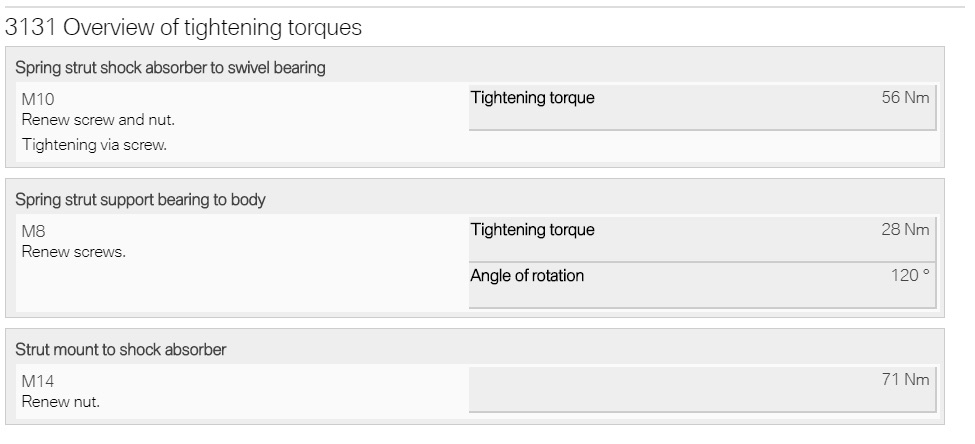
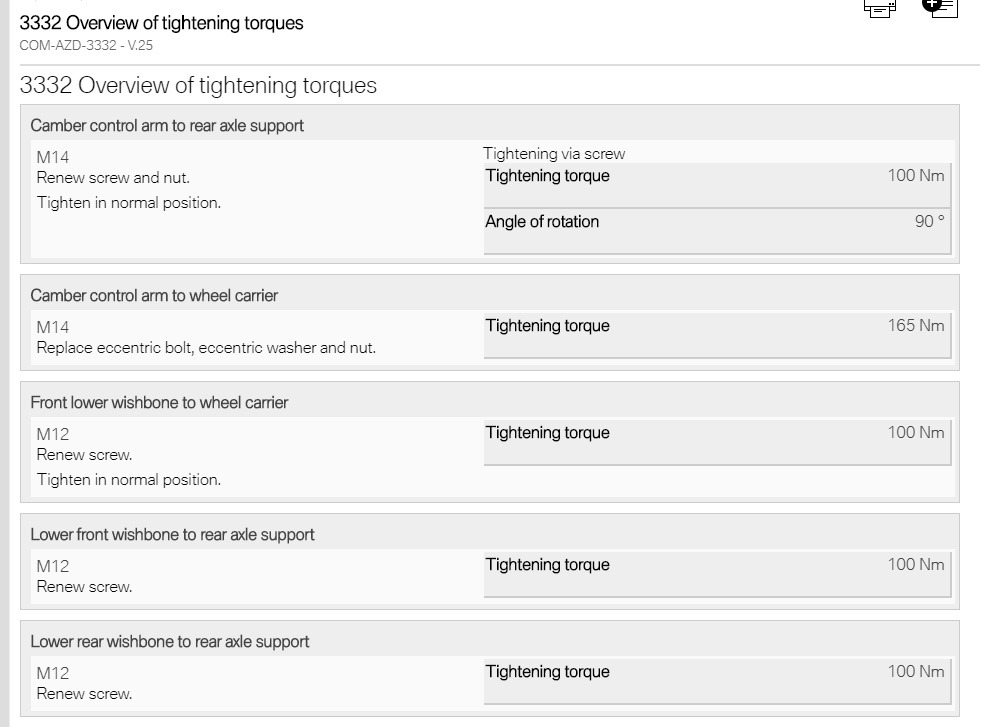
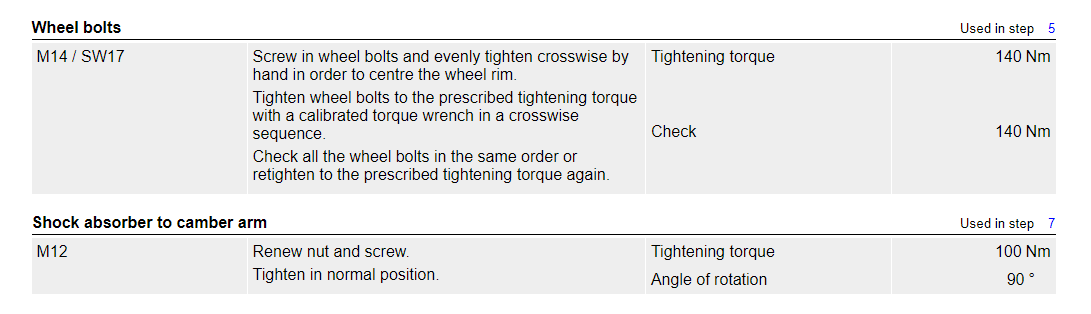
  1. On the LR/Driver's rear, detach the height sensor arm from the lower control/camber arm. 10mm and 9mm wrench

  2. Support the lower control arm to compress the assembly.
  3. I like to mark the camber adjusting bolt so that it can be place back close to that location so that the alignment isn't too far off so you can drive the car to the alignment shop. The white marks are a little hard to see here

  4. Remove shock nut and bolt using 18mm socket + wrench
  5. Remove camber and bolt using 21mm socket + wrench
  6. Lower control arm and remove spring
  7. Place the rubber pads on the new spring, line up the old positions and re-insert spring.
  8. Line up the control arm and support it to compress the assembly. Carefully make sure the camber bolt hole lines up, this can be a bit tricky, using a pry bar to move it into place can help.
  9. with the assembly compressed to simulate ride height, torque the bolts/nut to spec.
  10. Torque shock bolt to 100nm / 74 ft lb + 90 degree
  11. Torque camber adjusting bolt to 165nm / 121 ft lb
  12. Re-attach height sensor arm


Torque References
  • Strut nut: 71nm / 52 ft lbs
  • Shock bolt/nut: 100nm / 74 ft lbs + 90 degree
  • Camber adjusting bolt/unt: 165nm / 121 ft lbs
  • Wheel lugs: 140nm to 103 ft lbs


If anyone has anything to add or any suggestions I can update this post, if anyone has any additional pictures they may find helpful please let me know as I can add those too, I didn't have enough pictures for every step but includes the ones I did have.

AST Springs shortly after install (not yet settled).

Last edited by tdott; 02-25-2022 at 01:12 PM.. Reason: G80 / G82 M3 / M4
Appreciate 15
wpy70.50
FISH225402.50
jabrax10.50
LivinLrge201.00
playswcars3633.50
m20e30871150.00
yousefnjr6159.00
D///M31.50
Limegrntaln13472.00
PipeM3196.00
seirk193.00
      02-17-2022, 09:04 AM   #2
nearwater4me
Colonel
1916
Rep
2,135
Posts

Drives: '22 G82 Base
Join Date: Sep 2019
Location: GA

iTrader: (1)

Great writeup!
Definitely will come in handy for those wanting to DIY.
How's the ride on AST springs? Any noise?
Appreciate 1
tdott3942.50
      02-17-2022, 09:07 AM   #3
tdott
Brigadier General
3943
Rep
3,988
Posts

Drives: M3
Join Date: Nov 2010
Location: South FL / 6ix

iTrader: (4)

Quote:
Originally Posted by nearwater4me View Post
Great writeup!
Definitely will come in handy for those wanting to DIY.
How's the ride on AST springs? Any noise?
Thanks!
The ride is much better now, but that is because the PDI tech forgot to remove the plastic shipping bump stops and the stock ride was pretty bad and was mostly riding on bump stops the whole time. So we don't have a good comparison.

No noises, AST fixed that issue with the rubber isolator pad locations I believe.
Appreciate 0
      02-17-2022, 09:11 AM   #4
mike@x-ph.com
BimmerPost Supporting Vendor
mike@x-ph.com's Avatar
United_States
24199
Rep
190,807
Posts


Drives: 07-335/12-328/18-M4/21-M4CP
Join Date: Sep 2013
Location: Las Vegas

iTrader: (23)

Thank you for sharing

We also have a video with MSS install

__________________
Check out our current sale by clicking on this link!
https://x-ph.com/sale/

Phone number 702-494-9435
Appreciate 2
jabrax10.50
Limegrntaln13472.00
      02-17-2022, 09:11 AM   #5
nearwater4me
Colonel
1916
Rep
2,135
Posts

Drives: '22 G82 Base
Join Date: Sep 2019
Location: GA

iTrader: (1)

Quote:
Originally Posted by tdott View Post
Thanks!
The ride is much better now, but that is because the PDI tech forgot to remove the plastic shipping bump stops and the stock ride was pretty bad and was mostly riding on bump stops the whole time. So we don't have a good comparison.

No noises, AST fixed that issue with the rubber isolator pad locations I believe.
Oh, I'm sure it'll ride much better now then lol.
Thinking of switching to AST.
First I thought it was too low but the more I see them installed, the more I'm liking the drop/stance.

Did you not have any issues getting enough leverage for torquing the rear bolts?
I'm guessing you installed these on jack stands?
Appreciate 0
      02-17-2022, 09:14 AM   #6
tdott
Brigadier General
3943
Rep
3,988
Posts

Drives: M3
Join Date: Nov 2010
Location: South FL / 6ix

iTrader: (4)

Quote:
Originally Posted by mike@x-ph.com View Post
Thank you for sharing

We also have a video with MSS install

Thanks! I added this video to the OP! I didn't watch the entire video to see if you covered tools and torque specs or not but I'm sure others will find it useful too. Always good to have multiple points of views.
Appreciate 0
      02-17-2022, 09:17 AM   #7
tdott
Brigadier General
3943
Rep
3,988
Posts

Drives: M3
Join Date: Nov 2010
Location: South FL / 6ix

iTrader: (4)

Quote:
Originally Posted by nearwater4me View Post
Did you not have any issues getting enough leverage for torquing the rear bolts?
I'm guessing you installed these on jack stands?
This was done on a lift, so no issues with leverage. I also have some long handle 1/2" ratchets and a long torque wrench which makes it easier.

But yea, on jack stands it would be more difficult with the limited space, better to get the car up as high as possible.
Appreciate 0
      02-17-2022, 09:24 AM   #8
nearwater4me
Colonel
1916
Rep
2,135
Posts

Drives: '22 G82 Base
Join Date: Sep 2019
Location: GA

iTrader: (1)

Quote:
Originally Posted by tdott View Post
This was done on a lift, so no issues with leverage. I also have some long handle 1/2" ratchets and a long torque wrench which makes it easier.

But yea, on jack stands it would be more difficult with the limited space, better to get the car up as high as possible.
Thank you for the feedback. That's what I thought...
I guess I'll need to look for a rent-a-bay.

LOVE the color btw!
Appreciate 1
tdott3942.50
      02-18-2022, 12:01 AM   #9
mattssi
Major
876
Rep
1,369
Posts

Drives: 2019 X3
Join Date: Sep 2006
Location: Bend, OR

iTrader: (1)

Quote:
Originally Posted by tdott View Post
Thanks!
The ride is much better now, but that is because the PDI tech forgot to remove the plastic shipping bump stops and the stock ride was pretty bad and was mostly riding on bump stops the whole time. So we don't have a good comparison.

No noises, AST fixed that issue with the rubber isolator pad locations I believe.
I looked at my photos and my springs seem to have the rubber in the same locations as yours and I have the squeak. Odd that it seems to only be the passenger side. Hope you don’t run into it.


Great compilation btw.
Appreciate 0
      02-18-2022, 12:04 AM   #10
mattssi
Major
876
Rep
1,369
Posts

Drives: 2019 X3
Join Date: Sep 2006
Location: Bend, OR

iTrader: (1)

My rears didn’t have any isolators. So weird. Hope they send me some if needed.
Appreciate 0
      02-18-2022, 02:15 AM   #11
Grumpy514
Major
Grumpy514's Avatar
United_States
625
Rep
1,140
Posts

Drives: 2022 M3X
Join Date: Feb 2007
Location: DMV

iTrader: (1)

Garage List
Sweet write up!

I've yet to see this job being done on an xDrive..
Appreciate 0
      02-18-2022, 07:02 AM   #12
tdott
Brigadier General
3943
Rep
3,988
Posts

Drives: M3
Join Date: Nov 2010
Location: South FL / 6ix

iTrader: (4)

Quote:
Originally Posted by mattssi View Post
My rears didn’t have any isolators. So weird. Hope they send me some if needed.
Sorry I forgot to mention, I took the isolators off the stock springs and put them on the AST ones in the rear. I figured it couldn't hurt.
Appreciate 1
mattssi876.00
      02-18-2022, 07:52 AM   #13
Tommyboy1771
Private
14
Rep
53
Posts

Drives: G80 M3
Join Date: Mar 2021
Location: Germany

iTrader: (0)

Did anyone replace any of the one time use hardware or did you just “send it” with the old hardware. If anyone replaced the hardware where did you source it?
Appreciate 0
      02-18-2022, 09:54 AM   #14
mattssi
Major
876
Rep
1,369
Posts

Drives: 2019 X3
Join Date: Sep 2006
Location: Bend, OR

iTrader: (1)

Quote:
Originally Posted by Tommyboy1771 View Post
Did anyone replace any of the one time use hardware or did you just “send it” with the old hardware. If anyone replaced the hardware where did you source it?
I did, it's in my post on AST springs. Just got the nuts and bolts from the dealer.
__________________
2021 ///M3
2019 X3
Appreciate 0
      02-28-2022, 05:49 PM   #15
jpsimon
Team Zissou
jpsimon's Avatar
United_States
3065
Rep
10,197
Posts

Drives: 2022 AWD M3 Comp - SMB
Join Date: Dec 2006
Location: CT

iTrader: (7)

For those who have done the installation on an AWD version, any tips for the front axle? Sounds like there are a few additional steps
Appreciate 0
      04-21-2022, 05:26 AM   #16
ginohhh
Private
ginohhh's Avatar
No_Country
16
Rep
62
Posts

Drives: 2022 BMW M3 Competition Xdrive
Join Date: Oct 2020
Location: Chicago, IL

iTrader: (0)

Any DIY guide for the Xdrive version? Would love and appreciate for anyone to make a write up for one. I heard it's little bit more difficult as you have to the the front struts out? Thank you.
Appreciate 0
      04-24-2022, 07:01 AM   #17
Monteblueem5
Second Lieutenant
86
Rep
284
Posts

Drives: 13 m5
Join Date: Oct 2017
Location: Brooklyn ny

iTrader: (0)

I just did them on my x drive remove all wires from all the The front arm and remove 2 bolts Use a spreader
Some wd40 and pull down on Rotor slide shock out of
Lower control arm and remove 4 bolts up top and remove whole shock
Appreciate 1
Limegrntaln13472.00
      10-18-2022, 09:07 AM   #18
csmith5888
Private First Class
United_States
159
Rep
124
Posts

Drives: 2021 BMW M4
Join Date: Mar 2022
Location: Phildalphia, PA.

iTrader: (0)

Garage List
2021 BMW M4 G82  [9.75]
Has anyone found a simple way to adjust the rear spring height without removing the entire assembly? Fronts are simple to adjust while still on the car but rears seem to be impossible.
__________________
21' G82 M4 Manual Brooklyn Grey
ig: G82Cwo
Appreciate 1
Limegrntaln13472.00
      10-19-2022, 12:27 PM   #19
Limegrntaln
Major General
Limegrntaln's Avatar
United_States
13472
Rep
6,962
Posts

Drives: 2022 DG/BLk xDrive M4C Wk 34
Join Date: Mar 2008
Location: Sacramento Area

iTrader: (3)

Garage List
Quote:
Originally Posted by csmith5888 View Post
Has anyone found a simple way to adjust the rear spring height without removing the entire assembly? Fronts are simple to adjust while still on the car but rears seem to be impossible.
No, my installer adjusted my rear and he said the same thing. There's no way without taking the entire rear back apart.
__________________
2022 DravitGrau /Black Full Merino M4 Competition M xDrive / Production Week 34/ Delivered 10/19/21/ IG: dravit_m4_comp
YT: G Dubyou

Appreciate 1
      12-06-2022, 03:55 PM   #20
D///M
New Member
32
Rep
19
Posts

Drives: ‘23 BMW M3 6MT
Join Date: Nov 2022
Location: Chicago

iTrader: (0)

Great write-up! I'm thinking of installing a M Performance HAS kit myself now.

Quote:
Originally Posted by Limegrntaln View Post
No, my installer adjusted my rear and he said the same thing. There's no way without taking the entire rear back apart.
I saw this solution for adjusting the rears for KW v3 HAS on a F80 without taking off the control arms and figured it might be worth a look.
Appreciate 0
      12-06-2022, 03:59 PM   #21
Limegrntaln
Major General
Limegrntaln's Avatar
United_States
13472
Rep
6,962
Posts

Drives: 2022 DG/BLk xDrive M4C Wk 34
Join Date: Mar 2008
Location: Sacramento Area

iTrader: (3)

Garage List
Quote:
Originally Posted by D///M View Post
Great write-up! I'm thinking of installing a M Performance HAS kit myself now.


I saw this solution for adjusting the rears for KW v3 HAS on a F80 without taking off the control arms and figured it might be worth a look.
Oh, that might actually be a viable solution. Not a bad idea. I’d repaint the collar, just to avoid any corrosion, although, it’s aluminum. m.dreamin installed his, himself. I’m sure he can comment on how they were to install.
__________________
2022 DravitGrau /Black Full Merino M4 Competition M xDrive / Production Week 34/ Delivered 10/19/21/ IG: dravit_m4_comp
YT: G Dubyou

Appreciate 1
D///M31.50
      01-25-2023, 06:04 PM   #22
Jhanksm3
Captain
230
Rep
620
Posts

Drives: 2023 G80 M3 Comp
Join Date: Mar 2011
Location: Charleston SC via Raleigh NC

iTrader: (2)

Am I the only one having issues removing that 21mm camber bolt. I'm like wtf
Appreciate 0
Post Reply

Bookmarks


Posting Rules
You may not post new threads
You may not post replies
You may not post attachments
You may not edit your posts

BB code is On
Smilies are On
[IMG] code is On
HTML code is Off


All times are GMT -5. The time now is 03:41 PM.


g80
Powered by vBulletin® Version 3.8.11
Copyright ©2000 - 2024, vBulletin Solutions Inc.
1Addicts.com, BIMMERPOST.com, E90Post.com, F30Post.com, M3Post.com, ZPost.com, 5Post.com, 6Post.com, 7Post.com, XBimmers.com logo and trademark are properties of BIMMERPOST